Monday, May 30, 2022
Friday, July 5, 2013
DCWVdeals.com = Awesome!
Not sure how long the sale or code will last. Go to DCWVdeals.com (also like them on FB) and order away! They have awesome prices right now on all DCWV stacks. If you put in the code LETFREEDOMRING then you can 3packs for $20 and flat rate shipping of $5.95. How great is that! I ended up order their Epic Mat & Stack Packs. I ordered all 3 sets they had and paid under $26 (including shipping). I cannot wait for my order to come in. I will be getting 3 12x12 premium packs and 9 premium mat & stack packs. Their normal price for those sets are about $48, on sale for about $10, add in the code - get it all for $20 plus shipping. Quantities are limited. They also have tons of other great stacks. Thank you DCWVdeals.com - I am going to have a fun and crafty summer!
Saturday, June 29, 2013
Lifestyle Crafts..part 2 of busy creating!
I belong to a die of the month club at my local scrap store. Every month we get a new 2x2 die from Lifestyle Crafts. With that die we are to create an ATC card to be traded at our next meeting. The group of women that belong to this group are very creative. We like to think outside the box with these dies and create something completely different. Sometimes we'll use the die the way it is supposed to be used, other times we get creative. I do not take pictures every month of what I have made with the dies, really wish I did. I am learning and I am starting to take pics of what I have created with the die and a pic of the creation with the die case. The last 2 dies that I was given were of an umbrella and an owl. So, I put my thinking cap and tried to think outside of the box. What could I make with these two? First of all, the owl does not look like an owl! It looks like a pine cone, or baby chick, or almost a bit like a Furby. With the "owl" I thought long and hard. What did I finally come up with? A flower! Yup, I cut the owl out 3 times, ran my embossing tool around the middle and edges, then inked it up with my cats eye chalk ink. I used 3 different pinks. (hmm...maybe one of theses I will actually type this while still having the supplies around me!) I used the feet, beak and eyes as the center of my flower. I embossed my ATC card then covered it with my Gelatos (blue and green). After finding and attaching 3 leaves I adhered my flower to the ATC. Using pink chalk ink to match my flower I stamped the words "For Someone Special" and pop dotted it to the ATC. Here is how it came out:


Now, the other die I was given was the umbrella. I mad the umbrella into a punch bowl and cup. I used the handle of the umbrella as the ladle. I used the clear portion of the packaging as the glass portion of the punch bowl. Sheer red ribbon makes up our punch. There is funky yellow and blue circle "wallpaper" as my background, a gold disco ball, some pennants as wall decor for the party, and a pleated tablecloth made out of ribbon. I also used a cupcake brad, with back posts removed, to be a cake for the "party".


Now, the other die I was given was the umbrella. I mad the umbrella into a punch bowl and cup. I used the handle of the umbrella as the ladle. I used the clear portion of the packaging as the glass portion of the punch bowl. Sheer red ribbon makes up our punch. There is funky yellow and blue circle "wallpaper" as my background, a gold disco ball, some pennants as wall decor for the party, and a pleated tablecloth made out of ribbon. I also used a cupcake brad, with back posts removed, to be a cake for the "party".


Been Busy Creating!
Lots of pics coming up. I have been busy creating and decorating. Not too long ago I decided that I wanted to dress up the wall space above our mantel. Our walls are called High Drama - very nice red. I bought Bo Bunny's 12x12 pack of Enchanted paper. I had my husband cut out 9 12x12 pieces of plywood. I picked out 4 black pieces of paper and 5 pieces of white paper, then painted the sides of the boards (4 white, 5 black). I decoupaged the white papers on the black boards and black on white. My husband then laid a grid out on the wall so that all pictures would be even and properly spaced. My middle paper already had a saying on it so I highlighted some of the words with Red Stickles then outlined the border. I also added some flowers.With my Cricut I die cut the words LIVE, LAUGH,LOVE,FAMILY,FAITH & INSPIRE, then Stickled those in red also. All red words were adhered to the black papers. Here is how it came out:
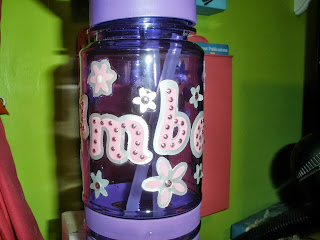
 With that done I decided to buy my daughter a water-bottle for her recital. To make sure it did not get confused with anyone else's bottles I busted out my Cricut and vinyl and personalized it for her. Using the Rock Princess digi cart I cut out the letters of her name at 2 inches in black and silver shadow. I also used blue and white gems along with my I-Rock to add some bling to the letters. Along with personalizing her bottle I also added her name to her mirror. I used the Type Candy digi cart that was free that week in the Cricut Craft Room. Again, with my I-Rock I added some bling. She loved it! I am now working on one for my niece and son. My niece has a purple bottle. I am using the Type Candy digi cart again with silver and pink vinyl. I also used my Cuttlebug and a 2x2 Lifestyle's Crafts die to make the flowers. She also has bling added to hers.

 I can't wait to mail it off to her! Will most likely use the Robotz Cricut cart to make the bottle for my son. He has a blue water-bottle, I just need some red vinyl to go with it.

Friday, March 22, 2013
Tim Holtz Tattered Floral Challenge
Ok...I am really killing 2 birds with one stone. I just completed the Tim Holtz Tattered Floral Challenge and still working on Heidi Swapps "What WOOD you do?" challenge. So, I went to Michael's and purchased a wooden album from Heidi Swapp as part of her challenge. Tim's challenge was to create anything with his tattered florals die. I decided to add the flowers to the wooden album cover. The album will be for my daughters recital photos. For the cover of the album I used Tim Holtz Distress Paint in Picked Raspberry. I inked the edges with Distress Ink in Vintage Photo. I used Recollections paper from Michael's to make the flowers and Tim Holtz Co'ordinations paper for my Tattered Leaves and Fancy Flourishes. The rhinestones are from Little Yellow Bicycle. Can't remember who the stickers are from right now. I now need to get this pic posted on Tims blog, then get working on the inside.


Friday, October 12, 2012
Tim holtz Inspired LO
So, on one of the scrapbook forums I visit I was challenged to create a LO with a few specific details. I had to include either raffia, burlap or other natural fibers and I had to use either Tim Holtz product or techniques. I started with light green sheet of Tim Holtz core'dinations Distressed cardstock. I sanded it down and distressed the edges. I used the Fall Line of Tim's distress ink along with Forest Moss and Scattered Straw to ink up my paper. I embossed a sheet of glassine paper with the Paisley embossing folder from Provo Craft, then distressed the edges and inked that up. Using more of Tim's paper I created 12 rosettes in the 3 different sizes that they come in (also, some Tim paper as photo mats). Inked up my Rosettes with Gathered Twigs and adhered everything to my inked up cardstock. I then picked out a ticket titled BLISS, inked it up and added MOMENTS to it with a tiny paper clip. OSV stickers as my title, raffia behind my rosettes and stickles and rhinestones on my rosettes. I made a small journaling tag with sticky bag canvas on a manilla tag. Inked my tag up with the fall colors, stapled some raffia to it, and did some journaling with my Distress Markers. I am pretty pleased with how it came out.

Now to go make more Rosettes to make some Pumpkins, Pinecones, and Turkeys! Gotta decorate fall. Will post once they are made.

Now to go make more Rosettes to make some Pumpkins, Pinecones, and Turkeys! Gotta decorate fall. Will post once they are made.
Thursday, September 20, 2012
Finally! Tim Holt Distress Markers and More!


Another goody that I just got my hands on is from Inkadinkadoo! One of my birthday presents this year. I cannot wait to play with it and start creating my own patterned papers. I did play with it a bit the other night.

Monday, April 16, 2012
Clearsnap
Check Clearsnap out on Facebook, Twitter, and Pinterest. Like, Follow, Pin and more - enter to win some awesome prize packs. Click on the link from the post below for more details.
Clearsnap: 3700 Friends To Celebrate!!
Clearsnap: 3700 Friends To Celebrate!!: Oh, it warms our hearts to see so many friends and fans on our Facebook Page!! We love the support from the crafting community and even mor...
Wednesday, January 25, 2012
CHA
Wow! I have been following many of the scrap companies for a while now. I am excited for all the new releases coming out soon! One favorite has got to be Tim Holtz and his distress markers. Can't wait for these new releases!
Purchased a new chair for My Oasis, so I should start up with nightly scrappin' soon. My daughter will be happy, she has been asking when I will be finished her baby album. So, hopefully with more scrappin' I will be on here more. Really cannot wait to try and comment on all of the goodies I received for Christmas.
Purchased a new chair for My Oasis, so I should start up with nightly scrappin' soon. My daughter will be happy, she has been asking when I will be finished her baby album. So, hopefully with more scrappin' I will be on here more. Really cannot wait to try and comment on all of the goodies I received for Christmas.
Subscribe to:
Posts (Atom)